Indesign | Datamerge (engels)
Automating Data Handling
InDesign CS2 has a powerful automation capability that very few people use: its Data Merge feature. This feature originated in Adobe PageMaker, and was enhanced and brought into InDesign CS if you bought the PageMaker Plug-in Pack. It arrived as a stealth feature in InDesign CS2 with little fanfare.
Data Merge can create documents which have personalized, or variable, information — such as business cards, mailing labels, form letters, even simple catalogs. The data for the personalization comes from the structured information in a database. But you can use a wide range of sources: Any data source that can create comma- or tab-delimited text is fair game (including Excel spreadsheets, database files, or Microsoft Word documents with tabbed text). You can, of course, do a mail merge in Word, but in InDesign, you have access to all its typographic refinements.
Data Merge can’t be described adequately in a single blog entry. Instead I’ll spread this description over several weeks. Today, I’ll describe what I’ll be creating in this series, and introduce you to preparing data for Data Merge. In subsequent weeks (I’m hoping to post weekly), I’ll cover creating frame placeholders in InDesign, importing the data and previewing it. We’ll also cover including images in the data, and laying it out with multiple records per page. (David also posted a blog entry in December 2006, answering a question about Data Merge. It pointed to a free article on Data Merge from InDesign Magazine by Rufus Deuchler.)
We’ll be creating two documents for an imaginary veterinary hospital: The first is a card to remind its clients that their pet needs to be brought in for its annual checkup. The reminder card will have variable data for the name of the pet, the date of the last visit, and so on. And there will be three different images used, depending on if the pet is a cat, a dog or a bird.

ReminderCard1

ReminderCard2

ReminderCard3
These cards display the variable data all on one page. But frequently we want to print multiple instances of the data on a single sheet. For our example, we’ll imagine that after the exam, the veterinary hospital sends out an examination certificate which is printed 4-up on a page. It will use the same data as the reminder card.

Certificate
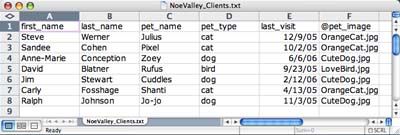
If you’re not familiar with data sources, it’s helpful to understand their language: A data-source file (which contains the structured information of a database or spreadsheet) is made up of fields and records. A field is a category of information — for example, an address or a zip code. A record is the complete set of fields that extend across a row of the data: Each field is separated with a tab or comma character, and each record is ended with a return character. Here are two more bits of terminology: The InDesign document that contains data-field placeholders is called the target document. It may also contain other boilerplate information — in this case the reminder letter copy — that remains the same in each iteration of the data merge. The merged document is the InDesign document that contains the boilerplate information, repeated as many times as it takes to accommodate each record selected from the data source.
Open up your data-source file (for example, the Excel document shown below), and save it, if necessary into a tab-delimited text (.txt) or into comma-delimited text (.csv) file. Notice that the first line of the data must list the names of each field; you’ll use these in your InDesign layout to designate where the variable data will go.
Excel data
Last week I began a series on using InDesign’s powerful Data Merge feature. After describing what Data Merge can do, I described the data-source files it can use. In Part 2, I’ll show how to create the target document—the InDesign document into which the data will flow—and how to link the data to the document, and preview the results.
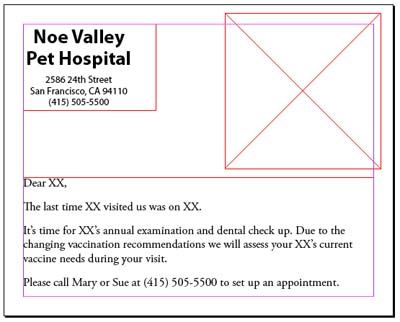
First, I’ll created the reminder card layout for our imaginary veterinary hospital. This card was created at its printed trim size, and contained the boilerplate information that doesn’t change (for example, the logo and the text of the card), and data-field placeholders. While creating the card I placed "XX" wherever the text data will be inserted. To create a frame for the pet image, I simply made a placeholder graphic frame with the Rectangle Frame tool.
Card Placeholders
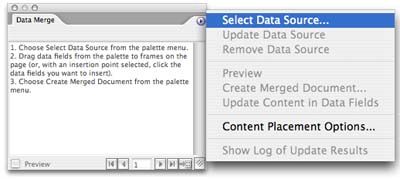
Next, I selected the data source. To do this, I opened the Data Merge palette (Window > Automation > Data Merge). When first opened, the palette shows the basic instructions for how to use it. I chose Select Data Source from the palette menu, and selected the data-source file we created in Part 1.
Select data source
The palette should be populated with data-field names that match the column heads (top row) of the source file. Sometimes, you may get an error message, "The data source has one or more empty field names…." This indicates your data source may have extra columns which are empty; those must be removed before Data Merge can use them. This can easily happen if you’re using Microsoft Word as a text editor, where tab characters aren’t always visible. Go back into your text editor, or Microsoft Excel, to delete them as necessary.
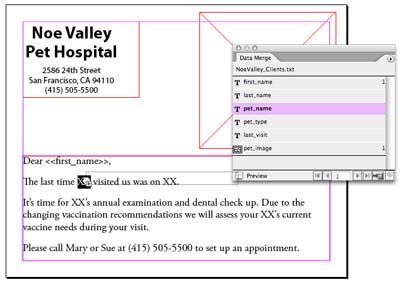
Next, I moved the data-field names into the layout template. You can either click an insertion point in your text frame (I highlighted my XX placeholders) and double-click the data-field name, or drag and drop the data-field name into place. The data fields will appear in the text surrounded by double angle brackets.
Drag fields
For text, you can use all of InDesign’s character, paragraph, or frame attributes to format them, including paragraph, character, and object styles. As you can see in the card, the data-field names don’t have to be in any particular order, and can be repeated if necessary. Add commas, spaces, or any formatting you need.
When you want to link the graphic image, just drag the graphic field name from the palette onto the placeholder graphic frame, and its name should appear.
Handling Variable Images. Handling variable images requires a little more preparation: If you remember from Part 1 there was one field which was for "pet_image". In order to indicate to Data Merge that that field is a graphic, its name must be preceded by the "@" character—in this case, "@pet_image".
In each subsequent line, the record must contain the path for InDesign to find the picture. The easy way to handle this is to place the images in the same folder as the data-source file. For my example, there were three images—OrangeCat.jpg, CuteDog.jpg, and LoveBird.jpg—located in the same folder. If you have the graphics in a different location, the field will need the exact path on your computer to the graphic, in a format appropriate for your operating system:
Mac: Macintosh HD:Photos:OrangeCat.jpg
Windows: c:\Photo\OrangeCat.jpg
Previewing Your Layout. I then previewed the data by checking Preview at the bottom of the palette, and then used the navigation buttons to move forward and back through the records.
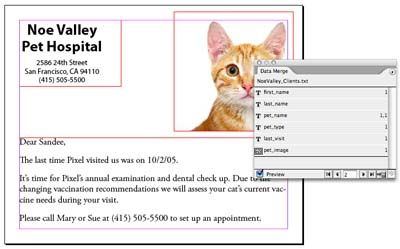
Preview cards
There are a couple of good reasons to do this:
- To look for records that don’t fit the frame you have created (like a long name you didn’t anticipate). The frame should be large enough to handle the largest element in the formatting you’ve chosen.
- To look for other errors in the data. These could include extra tabs or commas (this shows up where the right data in the wrong place) or having data capitalized when it’s not supposed to be (you didn’t check over the data-source file before using it).
In general, it’s preferable to fix these kinds of problems in the data-source file, instead of in the InDesign file.
In the next episode, we’ll discuss how to merge the target document (the layout) with the data-source file to create a merged document.
It’s been much longer than I expected finishing this three-part tutorial on InDesign’s Data Merge feature, but it’s been a very busy period for me. You’ll find part 1 here, and part 2 here. When I left you, I had created a reminder card layout in InDesign CS2, and created text and graphic frame placeholders. I selected the data source and linked the data fields with the placeholder frames. Finally, I previewed the result.

ReminderCardLayout
Now, it’s time to create the new data merge document. Click the Create Merged Document button (circled above), or choose Create Merged Document from the palette menu. This opens a three-tabbed-panel dialog box. The most important panel—Records—is where you select which records you want to include in your merged document. But equally important, you need to choose the number of records per document page. (This choice has tripped many people up.)
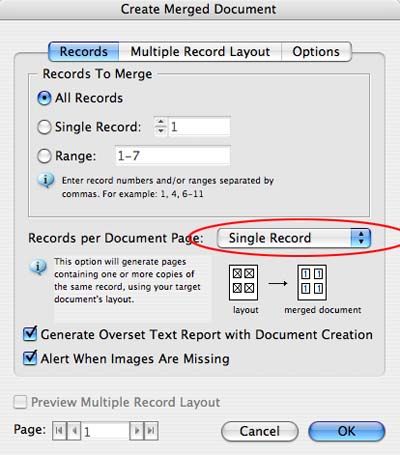
Select records
The layout we’re creating is a Single Record. That is, it creates exactly one physical page for each record in the merged document. (Remember, from our first posting, that a record is the complete set of fields that extend across the row of data. We’ll show you a Multiple Record layout next.) There are also options to generate a report if text gets overset in the process, or to generate an alert when images are missing.
You also want to click on the Options tab. Here you have choices for how to fit images in your graphic placeholder frames. (I prefer to presize my images to exact size ahead of time by running an action on the images in Photoshop.) You can also remove blank lines for empty fields or set a maximum number of records in a document. When you’re finished, click OK.
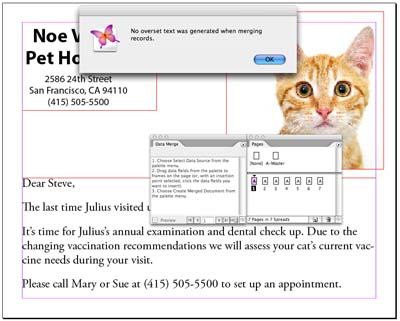
InDesign starts thinking about what to do. For a large data merge, this can take quite a while. Finally, it generates a new document containing the records you selected. As you can see in the illustration below, there was no overset text, and seven pages was generated in my simple example.
New Document Generated
Multiple Record Layouts. Now let’s show you an example of a Multiple Record layout. This is an imaginary examination certificate which will be printed 4-up on a page.
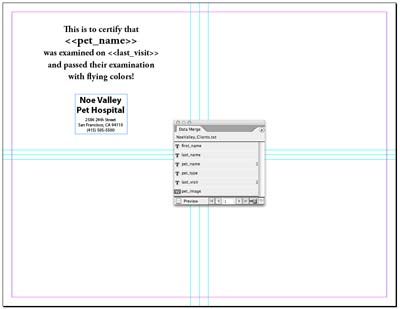
Certificate
I find it helpful to create guides to help me figure out how to position the 4-up layout. When you create the Multiple Record layout, you only place boilerplate and placeholders on the layout once. You’ll position the other records using the Create Merged Document dialog box. (You can also place data-field placeholders on a master page.) When you click the Preview, you’ll only see a preview of the first record. Click the Create Merged Document button to open the dialog box.
This time, in the Create Merged Document dialog, choose Multiple Records in the Records per Document Page popup menu. Now the Preview Multiple Record Layout becomes available at the bottom of the dialog box. Don’t worry if things aren’t lined up the way you want. Click on the Multiple Record Layout tab to fix that.

Multiple Record Layout
Here is where you position the other instances of records which will appear on the same page. You’ll need to tweak the controls in the Layout of Records section to position the other records. This is where having the guides on the page helps you to position the elements more precisely. When finished, click OK to generate your new merged document.
There are a lot of other fine points which could be added here, but this blog entry is long enough already. Continue to leave your comments here on your experiences using Data Merge. It’s not a perfect solution for all data needs, but it’s helpful for simpler layouts. And it’s free!